OMINS gives you the opportunity and flexibility to send automated emails to your customers with or without attachments.
Main features:
- One click send: Customized emails can be configured to be sent with one click directly from your invoice page.
- Customized emails: You can make your own customized emails to be sent.
- Different emails for different situation: You can make and customize as many emails as you want for different situation like invoice email, payment request email, full payment request emails, asking further details email, and so on…
- Scheduled sending: You can set the emails to be sent manually on your click or you can schedule them to be sent automatically.
- Attachments: You can set your emails to automatically attach different invoices like odt invoice. System will automatically attach invoice for that order, with that email.
- Merge tags: You will bring in information from here and there, like product id, customer name, auction #, to be inserted in your emails automatically via merge tags already provided in invoice email system.
- You can activate or inactivate any email by just one click.
- You can send your emails either as plain text or html.
HOW IT WORKS
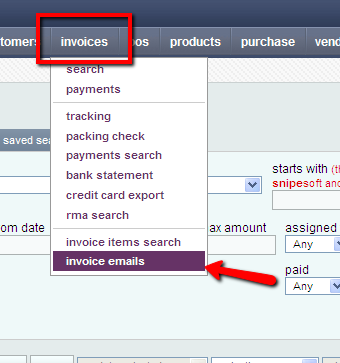
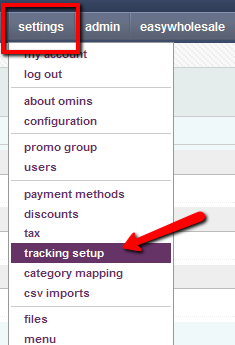
To access email system go to invoice menu then invoice emails (see pic 1 below)
Default emails
OMINS gives you some pre-defined emails for many situations. Following is the list of some of those emails
- Please send details.
- website order notification
- underpayment
- final reminder to pay
- urgent reminder to pay
- overpayment
- checkout
- invoice
- tracking email

(click image to enlarge)
You can edit any of these emails as you wish or send them as is.
NOTE: While making or editing emails, please do not change any merge tag. You can insert or delete any merge tag en-bloc, but do not change any part of merge tag, otherwise it will stop working and will not bring in information, which this is supposed to bring in email.
Editing a pre-structured (default) email
Go to invoices —> invoice email as shown in figure above.
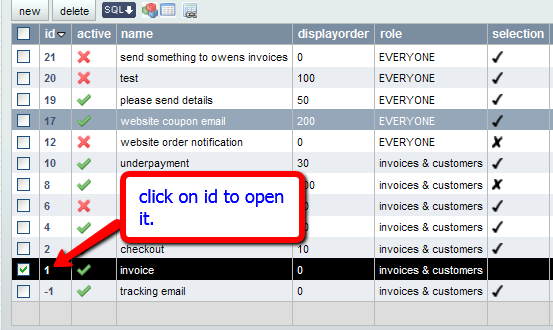
Click on id of email you want to view or edit, to open Email setup
(click image to enlarge)
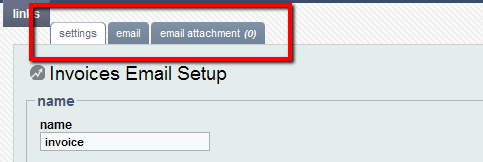
On next page you see three main tabs
- Settings
- Attachment
Settings tab: This is main setting page for this email type.
(click image to enlarge)
- Name: Give any other name you want to give this email.
- Pulldown settings: if enabled, this email will show in the email dropdown menu within order (see “manual sending” below for more information on this)
- Scheduled settings: This will be described in detail in a separate heading below in this article.
Email tab: “see images 6 and 7 below”
(click image to enlarge)

(click image to enlarge)
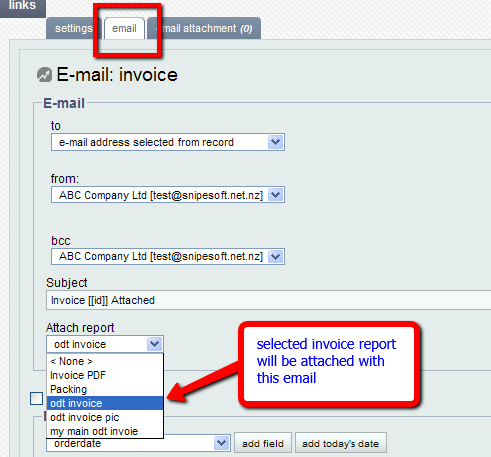
“To” address is automatically selected from records,
From address, you can set it.
Bcc: you can write any other email address or your own to send yourself a copy.
Subject: You can set your own, can insert any other merge-tag, other than default, if you need.
Attach report: You can select invoice report from here to be attached to this email. Only those reports will show here, which are enabled to be sent as email attachment from setting report section see “custom invoice/label system” help in guides section.
You can select this email to be sent as plain text or html.
Further down is shown body of the email, you can edit text, add or remove merge tags.
Here you can select and insert merge tags from dropdown menu. Please be careful about merge tags, either insert or delete en-bloc, do not change any part of merge tag or brackets. (see image below)

(click to enlarge)
Click save. To save this email.
Making new email.
Click invoices menu and then invoice emails
Click new

(click to enlarge)
Next screen, give this email an appropriate name.
Click save.
set the settings as you wish.
Make your custom email from email tab
You can use merge tags from the list.
How to send emails
Manual sending
While processing orders, in the order page, you can see email section on right sided pane. Select email name to be send (only those emails will be displayed here, which you have enabled in pulldown menu in the settings tab.
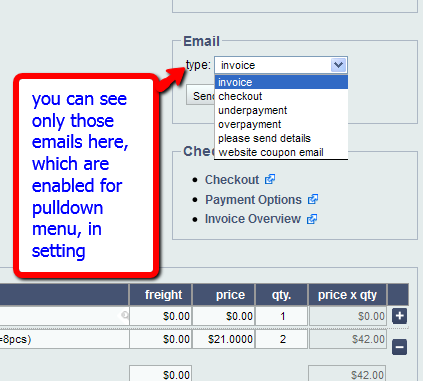
(click image to enlarge)
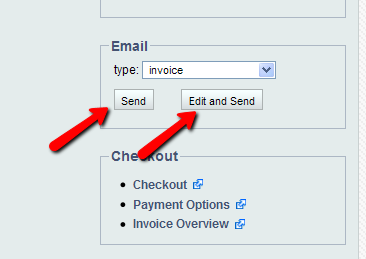
Select the email and now you can either
Send: instantly send that email OR
Edit and send: clicking this will open this email setup where you can edit as required and send. ( see images below)
Scheduled sending:
Enable “send schedule” from settings tab of email setup page. Then you can select any saved search from list. you can set how many times the email to be sent and can specify which time the email should be sent. When your saved search criteria is met, this email will be sent automatically.

(click image to enlarge)
Saved searches
You can access saved searches from invoice main page — > saved searches tab. Clicking any search item from drop down menu, will run that search.

Special note about tracking emails:
Tracking email setup is a bit different. You can set settings and scheduling from invoice emails but body of the email will be written / edited from tracking setup.
This means that a individually customized email is sent for each courier company you use, ensuring the customer gets the appropriate details for that courier company, OMINS will automatically know what courier company is used and sent the appropriate email based on the format of the tracking number. you can customize these emails in tracking setup.
(see pics 13, 14 and 15 below to describe the steps)
—–

(click image to enlarge)
you can edit emails for different couriers.

(click to enlarge)
for further assistance, please contact support@snipesoft.net.nz
This post is also available in: Chinese (Simplified)

